Showing posts with label Coloring. Show all posts

Monday, January 12, 2015

The Guy Who Almost Faded Away

I mentioned a couple of post ago how I've been sitting around not drawing.  I'd sketched an image and struggled for weeks trying to create it the way I'd envisioned it.  Unfortunately, that process stalled completely.  Friday I decided to just do it.  To take whatever it was I had already done and keep going.  There's no such thing as perfection after all.  It's something that will forever remain elusive and paralyzing.  So I'd rather keep creating.  Anyway, I actually filmed the process of this particularly project, so until I update this post with the edited film, here are a few of the stills.


The usual inking and color outlining done.  Just going with the flow on this one.  Nothing particular in mind, except that I wanted dark, bushy-like eyebrows.


As always, I fill in the color of the eyes first.  For some reason I do the eyes before letting everything else blossom.  It may have something to do with how I'm inspired by Naoko Takeuchi.  Nonetheless, I also colored areas of shade/shadow, and filled his top lip.  I had a little problem with the ink not drying properly, so when I went to erase the penciling, some of the ink smeared.  


Now time for the crafty part.  I had a cousin over and, from a multitude of scrapbook paper, she picked up this denim background and a shimmery gold piece for his cap.


So I had to scalp him to get all the necessary pieces traced and put back together.  Thankfully, he remains unbothered by the event.  While the pieces were off, I dusted him with a fleshy yellow-tinted chalk pastel and a soft brown for his hair.  I used a paper towel to even it all out.


Almost done.  All the pieces glued in place now.  I streaked his hair with a single black colored pencil and four shades of brown.  I used an eraser to streak in highlights–which I don't believe showed all that much.  Added pupil effect to eyes.


Not sure if this is the complete version yet.  I added jewel studs (because I love studs) before the scan.  Scanned him in, revived color, darken the black areas of the cap, eyebrows, and eyes.  He reminds me of a certain popstar, but I'm good with that.  The innocence, the youth, the potential look of caution; done.  We'll name him Tae Hee.  Now on to the next project.

Tuesday, November 12, 2013

Drawing Cakes #2-4 Blog Post


Here we are with the coloring process that I use in my drawings.  I've provided links in the above video that navigate from videos 2, 3, and 4.  Please enjoy, share and comment.

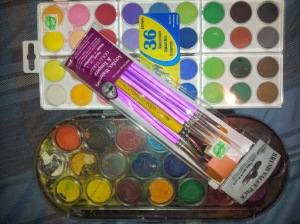
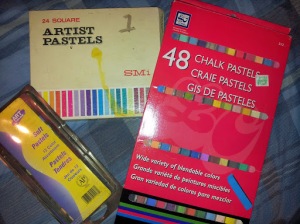
With that said, here lies the coloring tools that I use:
 
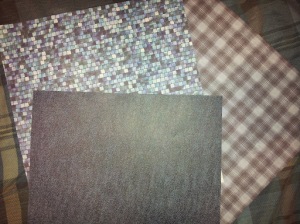
I usually combine drawing with crafting, so I wanted to make sure to point out that I love scrap-booking paper (as seen above).  This type of paper comes in handy when you don't necessarily want to color/design a character's clothing or backdrop.  It's also useful when you want to reach for something unique, different, and abstract to the eye.  Now don't get me wrong, I love coloring in my own clothes and backgrounds; however, sometimes scrap-booking paper can do what I can't.  They further help my vision come alive by popping with a different, dynamic set of colors alongside those that are hand produced.  Sometimes they're tricky to use because you have to remove portions of the drawing to achieve the effect that you're after.  But my goodness, when you get it right--you get it right.  Especially with portrait-style drawings.  

 
The brand of color pencils that I use are Prismacolor and, even more specifically, their soft core pencils.  I use color pencils for a variety of techniques surrounding a drawing.  However, the main purpose is for blending in the tones that make up the eye of the character.  Example: If a character is blue-eyed, then I take three different shades of blue to create a gradient look to the eye.  Nevertheless, I also use color pencil for small detailing and designing, but another important technique I use these for is character hair.  

As seen in the video, I usually do a character's hair in four layers.  I base paint it with water-color determined by the character's hair color of choice.  (Note: if the character's hair color is black, I use a light purple or light blue base because black on black can come off as too heavy.)  Then I use chalk pastels to further flesh out the color, giving it shape and dept.  After this layer I find three shades of one matching color pencil, or two shades and an automatic black color pencil, to draw and add flair to the character's hair before the final layer of highlighting the character's hair via an eraser.  This eraser layer gives the hair movement.
 
 
I love water coloring mostly for small details, filling large spaces, and background flourishes.  Nevertheless, the majority of its us is for adding a base color to another layer of color using a different tool.  Occasionally it's the opposite way around where I use another type of coloring tool (such as a coloring pencil) as a base and use water colors to fill everything in further.  In any regard, I like water color because it's light enough for blending and strong enough that you can cover/color over certain areas that aren't coming alive like you'd hope.  Furthermore, it's just fun!

 
Chalk pastels are probably my favorite coloring tool.  Back in the day these were the tools that really took my drawings to another level of applied techniques.  And I've stuck with what I've learned till this day.  See, I didn't have money for expensive markers and had to make due with what was available to me.  Luckily, an old art teacher had an old set of chalk pastels that I could use to explore my passion with after she taught us a few tricks on using them during a school project.  While chalk pastels can be messy (even ruining a drawing) and take careful use to control, the way they blend over wide spaces is just unbeatable, considering what I'm trying to achieve with a particular drawing.  And because it can be a little too harsh when applying darker shades, you also have the added benefit of merging two different tones to keep a happy medium.  There is just something soothing about blending with chalk pastels, which is why I've stuck with them despite their messiness.

---------------------------------------

Okay!  Those are my coloring tools that I use.  Occasionally, I find a reason to use oil pastels, crayons, and acrylic paint.  I also have been known to use hair color spray and other scrap booking materials such as stickers and plastic gems.  Once the drawing is scanned, I carefully decide whether or not it can use the Revive Color filter or not in my design program; physical and digital prints usual look differently to me.  

Whatever it takes to honor a vision, I say.

And last but not least, a scan of the finally results from the video series Drawing Cakes...

Michael Yoon's Legend

 
Thanks for reading and watching this series of posts and videos.  I hope it inspires those who are looking for ideas.  And just remember that when you express yourself through drawing--whatever that may be--remind yourself that you're a pipeline of ideas that will never dry up.  Keep going.  Keep exploring.  Keep imagining.  Don't let anyone tell you that what you envision and produce is less than another form of art.  If it's in you, it's there for a reason.  It's there to be expressed, not stifled down.  

If you miss Drawing Cakes #1 post on inking, here is the link: http://www.comictowel.com/2013/11/drawing-cakes-1-blog-post.html

Total Pageviews