Showing posts with label Drawing. Show all posts

Tuesday, January 13, 2015

Drawing Tae Hee Video Set

Hey, hey now.  Here's the two promised videos that accompany this POST I did a couple of days ago.  Commentary included.  Hope you enjoy!

Monday, January 12, 2015

The Guy Who Almost Faded Away

I mentioned a couple of post ago how I've been sitting around not drawing.  I'd sketched an image and struggled for weeks trying to create it the way I'd envisioned it.  Unfortunately, that process stalled completely.  Friday I decided to just do it.  To take whatever it was I had already done and keep going.  There's no such thing as perfection after all.  It's something that will forever remain elusive and paralyzing.  So I'd rather keep creating.  Anyway, I actually filmed the process of this particularly project, so until I update this post with the edited film, here are a few of the stills.


The usual inking and color outlining done.  Just going with the flow on this one.  Nothing particular in mind, except that I wanted dark, bushy-like eyebrows.


As always, I fill in the color of the eyes first.  For some reason I do the eyes before letting everything else blossom.  It may have something to do with how I'm inspired by Naoko Takeuchi.  Nonetheless, I also colored areas of shade/shadow, and filled his top lip.  I had a little problem with the ink not drying properly, so when I went to erase the penciling, some of the ink smeared.  


Now time for the crafty part.  I had a cousin over and, from a multitude of scrapbook paper, she picked up this denim background and a shimmery gold piece for his cap.


So I had to scalp him to get all the necessary pieces traced and put back together.  Thankfully, he remains unbothered by the event.  While the pieces were off, I dusted him with a fleshy yellow-tinted chalk pastel and a soft brown for his hair.  I used a paper towel to even it all out.


Almost done.  All the pieces glued in place now.  I streaked his hair with a single black colored pencil and four shades of brown.  I used an eraser to streak in highlights–which I don't believe showed all that much.  Added pupil effect to eyes.


Not sure if this is the complete version yet.  I added jewel studs (because I love studs) before the scan.  Scanned him in, revived color, darken the black areas of the cap, eyebrows, and eyes.  He reminds me of a certain popstar, but I'm good with that.  The innocence, the youth, the potential look of caution; done.  We'll name him Tae Hee.  Now on to the next project.

Thursday, October 2, 2014

The Boy Who Loves Capes


This sketch came while I was at the library with my cousin and her daughter. I happened to bring a drawing pad and started sketching away. As always, I had no direction; just drawing. I only knew I was drawing a cute, youthful girl.  Or so I thought. For about a week I wrestled with the sketch, standing before the mirror trying to figure out why it wasn't working the way I liked. I continued to go over and over the drawing until I realized that it wasn't a female character, it was a male. A spunky boy who needed a smirk and a high-collared cape.


Red-head was the first thing I decided.  He was spunky, right.  Green eyes followed.  The rest I inked away.  I tried to make a big–but not too dramatic–bejeweled collar.  Don't know if I got it right, but I remove all kinds of pressure when drawing.  Just let it flow.


I had black, textured felt in mind to make up the collar.  So after I water-colored his hair orange, and shaded his eyes, I x-acto knifed the collar portion. 


I initially wanted to water-color the background a deep red, saw this scrapbooking piece in a bag (the black-fading-into-red goth boutique look), and changed my mind.  The trick was cutting around the outline of the collar, as I went about removing the negative space to fit in his backdrop.  I still needed the shape of the collar as a guide, but thought I eventually could cut out the outline...  


...But I kept it, coloring his collar's outline the same red as the cape.  Having that outline of red just seemed to make it all pop just right.  As you can see, it was all messy; so much so that I put a blank piece of paper underneath him to color everything with abandon.  Nonetheless, once the water color dried, I laid a basic orange and red chalk pastel color to his hair and cape (once again, I love layers).  As for his skin-tone–a light flesh color.  He looks so English schoolboy here. 


With all the screen and felt glued in place, I finally went about adding streaks to his hair with Prismacolor pencils.


Fill in the pupils; highlight the hair. This is actually the last shot from my camera, as opposed to a scanned form. I liked the scan version, but felt like my scanner was so small that I was losing lots of areas of the character. The jewels on his collar were cut out, as well as the cape's brooch. I did the same digital revive and retouch (or what I could, considering I'm nowhere near an expert) and added accents to the eyes so they glowed.  Now, there may be an issue with lighting between the two versions, but the darker tint of the camera's shot kind of works with the theme. 

Not in the strictest sense, but he seems Korean to me now. 

In its entirety, the drawing has this whimsicalness to it that I love. A cool kid who likes bejeweled capes with high collars; learning toward vampirism and goth, but severely unlike either.

Thanks for stopping by.  Visit Draw & Manga page for more.

Friday, September 19, 2014

Towel, the Girl Who Loves Sweets


I found this sketch while cleaning out a couple of sketchbooks, drawing tablets and portfolios.  There, tucked underneath a couple of bags from Hobby Lobby, lay this drawing.  I don't recall when I started it, or why I stopped.  I just looked at it and was suddenly inspired to create something sweet, using my favorite blond character, Towel (that's her nickname)!  The thing is that I fought the impulse to make changes to the sketch.  Instead, I wanted to act right away with the coloring process.  Didn't want to think too much.  Just wanted to grab the sketch and move.


As always, inking comes next.  My favorite Precise V5 pen did the grunt work.  Followed by a simple yellow Sharpie (yes, Sharpie) to outline her hair.  Last, I used a sand-colored Copic marker to outline and give a little shadow/shading.  I chose the skin-toned markers according to–you guessed it–skin tone.  And though she's blond, it doesn't mean she's a tanned blond.  Nevertheless, I always try to shadow lightly, throwing the whole concept of coloring "by light source" out the window.  I also used a flesh-colored Copic marker to guide her upper lip so I wouldn't lose the shape before I added a darker color.


Here, I water colored her hair a simple canary yellow.  And because her eyes are brown, I gathered my usual three-tones to give her eyes a gradient-like effect. Always more color!


X-acto knife ready, I carved away the negative space to get her ready for the felt, ice cream backdrop I decided to use.  I didn't glue her on right away because I knew that it would be a mess to do so first and then start using chalk pastels.  I also knew it would be a mess to add the chalk pastels and then use the x-acto knife to carve her off the negative space.  So for a while, I had me a cute paper doll tapped to my drawing board.


I normally use a dark toned pastel to match a character's hair, but here I used a matching yellow instead.  I coated her lips with a dark pink Prismacolor pencil.  These are my favorite pencils because of their soft, creamy tips.  As for the chalk pastel, used for her skin toned, I chose a shade of brown that I more or less liked when I first laid it down.  I managed to even it out by blending in a lighter flesh color, running a dry paper towel over the two to even her out.  Of course, I used a thin-tipped eraser to clean the edges.


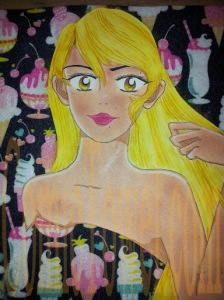
Three Prismacolor pencils used to add layers and effect to her hair.  A very light canary yellow, golden rod yellow, and an almost sienna brown were used.  Once the streaks of pencil are in, I use another dry paper town to blend it all in with the chalk pastel.  Then I use a gummy eraser to add highlights in long streaks.  I retook the Precise V5 pencil to fill in her pupil and mark some effect lines on the edges of her iris.  Lastly, I glued her to the felt, seemingly as if she came out of a pocket of space.


The digital scan.  But first, I added the usual whiteout shimmer to her lips and eyes.  I also added the cutie 3D stickers in support of the theme (sweets and ice cream).  The cherries work as earrings; the watermelon (hopefully) as a ring.  As for the drawing, I did the usual reviving of color the second I scanned it.  That seems necessary when a drawing moves into digital format.  I also cleaned up around her arm.  When I found the original sketch there were marks I had to work over that I knew during the process were going to need retouching.  I have yet to retouch her left eyebrow by slimming it down and back some.  And while her arm is a little shapeless, I decided to leave it as it is.  As I mentioned earlier, I didn't want to get into making adjustments to the sketching part; instead I jumped right in. 

Hopefully I didn't miss anything.  Yeah well, I know I did somewhere.  Anyway, thanks everyone for allowing me to share this!

 
Another on the way!

Monday, June 23, 2014

The Gold Fleur

Hi, everyone.  Blogger has been acting a straight fool lately and I've been impatient with it.  I don't know what the issue is, but nothing’s loading properly--including this new blog post on my latest drawing.  Nonetheless, I think I'm there.  I think it’s doing its job, and now it’s time to share my process again through a series of images.

I've named this image Fleur.  The character’s name is still unavailable to me.


I sketched the actual drawing probably three months ago and just left it, for some reason. Therefore, I don’t have the penciled version. Nonetheless, as of recently, I went through the process of inking the drawing and adding all the particular areas that would require shading/shadows regarding the flesh (I use Copic markers for this). Besides using the usual colored pencils to add tones to the eyes, I also used a screen/pattern early within the process as the backdrop. Because the process only gets messier, I try to have this construction part out of the way as early as possible. Anyway, at first I meant to apply the screen/pattern as the shirt, and then realized there wasn’t enough paper. I like it better as a backdrop, though. So having carefully carved out the negative space, I added it on as needed.


Now on to the colors. Water coloring is always my base of choice because it’s light and covers space quick and easily. Because I decided his shirt would be yellow—in semi-accordance with the gold fleur de lis within the backdrop—I painted it a light yellow. Just as his hair would be brown, I gave it a light-brown color. However, as seen, I covered the hair with a dust of brown-toned chalk pastels before I applied the yellow chalk to his shirt. I’m all about layers. Get the base color, and then add more and more colors!


Because I like layers, I try to add the darkest color first when it comes to chalk pastels. Why? Because it can get messy. Adding the dark color first allows me to clean up the edges before applying lighter colors. As seen in this image, I added a yellow chalk pastel to his shirt as well as a flesh color to his skin tone. As for the hair, it was time for a layer of colored pencils toned and streaked through his hair to give it vibrancy (I eventually use a tissue to blend the three mediums that layers the hair). Furthermore, I used wooden beads and brown string to craft the drawstring area of his shirt. As for his undershirt, I applied a ragged piece of actual denim to give it form.


Almost finished. I streaked his hair with a gum eraser as a form of highlights, and then gave sparks (an actual whiteout pen) and further flourishes to his eyes and the glisten of his lips. On the crafting aspect, I used more string to construct him gently gripping a necklace consisting of bejeweling stickers, and a gold cross sticker. I went through several designs of the cross from what I had available before I decided to stick with a gold one. This cross, in particular, matches his earrings, which are also stickers taken from the same batch.


The final part. Immediately, after I scan a drawing, I revive its color in PhotoFiltre. Hey, it’s all I got. The reason I do so is because digital images come out differently than the original. So I found it best to give some digital brilliance to the colors. Nevertheless, because the image is further decreased to portrait size, I also made corrections and adjustments. One of those corrects were to brush a matching brown color over the wooden beads that makes up the drawstring of his shirt. This was to cover the dry crafts glue peeking out. Other adjustments called because certain aspects tugged at me. Like his lips. I brushed over the glisten I originally intended, deciding it looked best without. I also touched up the glisten in his eyes by applying a softer gray over them to bring down the brilliance. Sometimes you have to make little adjustments as the digital image always looks differently than the actual one. A little clean up in an otherwise never-perfect drawing.

I have about four other images I’ll be sending off before turning them into journals and other items on my Zazzle shop, this one included. Until then, let’s come up with a name for him.

I sometimes get message from people asking me what inspires me to draw in this style.  Then there are some who pinpoint it right away.  In any regard, I idolize Naoko Takeuchi (Sailor Moon) and Miwa Ueda (Peach Girl) and their shojo manga drawings.  I love the youthfulness, softness, and simplicity of shojo-themed drawings.

Wednesday, June 11, 2014

[1] Cameron's Walking in this World

Listen, as I read Julia Cameron’s Walking in this World, I am jumping up out of bed with inspiration.  Trying to close and lock away the awaiting 5am alarm for the beginnings of a 6am shift, I put down the book at 11:11pm, cracked open my drawing tools, booted up my computer, and decided to do a little work.  I managed to ink a picture I sketched two months ago, and I've come to jot down the draft to this post as I work on another post’s draft, as well as put a couple of words to that book I’ve been not-so writing.  Why the sudden burst of inspiration so late at night?  Because of a few encouraging passages in the book woke my creative spirit.  And most certainly in divine order.  So I want to share these first few passages with you.  They're just quick and immediate jot-downs that, while the book is too enormous to contain, I wanted to make a purpose of documenting for my future self as well as you.  I hope they fire up your creative spirit as well.  Let’s go!

“Walking in this world, we do not go unpartnered.  We do not speak our prayers unheard.  There is someone or something listening with the most tender of hearts.  As we open to our inner life, our outer life also shifts.  Lives are transformed by a gentle form of listening that is like walking with a cherished friend who listens and then says, “You might want to try X.  Oh, look at that great squirrel…”

“As we go within, we discover that we are not alone there.  The loneliness we fear finding in art is actually the loneliness of disconnecting ourselves from our creativity and our creator.  As we try our hand literally at the making of something, we do meet our maker.  As we try to make more and more, more and more is made of us and through us.  'Not I, but the Father doeth the work.'”

“Begin where you are, with who you are.  In order to go where you want to go creatively, you have to start somewhere.  And the best place to start is precisely where you are.  This is true whether you are a beginning artist or someone with long miles down the track.  In fact, seasoned artist can waste time and energy mulling the dignity of their acquired position in the field when the truth is, they still need to just start again.”

“Five minutes might lead to ten, just as a tentative embrace leads to something more passionate.  Making art is making love with life.  We open ourselves to art as to love.”

“A small beginning is exactly that: a beginning.  Rather than focus on large jumps--which may strike us as terrifying and unjumpable--we do better to focus on the first small step, and then the next small step after that.”

“One day you just have to start and what you do that day is the beginning of success or failure.”

“Creativity is inspiration coupled with initiative.  It is an act of faith and, in that phrase, the word 'act' looms as large as the 'faith' that it requires.”

“When we do not act in the direction of our dreams, we are only 'dreaming.'  Dreams have a will-o’-the-wisp quality.  Dreams coupled with the firm intention to manifest them take on a steely reality.  Our dreams come true when we are true to theme.”

Let these words encourage you today, just as they have done for me.  Whether it’s to create something you've been pondering upon, or to simply step out in faith toward something that you desire to manifest in life.  Do it.  Wake yourself up and take that step.

Monday, November 25, 2013

Virtual Portfolio 2002-2013

Hi, Comic Towel readers.  To sort of semi celebrate the one year closing of my small blog, I played around with Windows Movie Editor to create a virtual portfolio of many of the drawings I've shared throughout this year.  As I mentioned before, there was a point where I stopped drawing completely because I didn't know what to do with my drawings.  Nobody saw them, tucked away in my personal portfolios.  So as a newly "invigorated" individual, I realized it was time to pull them out and this time share them through whatever available platform.  What's even more interesting is that these drawings span eleven years (2002-2013).  That in itself marks a small sense of personal significance to me.  

So here we go.  My first virtual portfolio.  Enjoy...

Tuesday, November 12, 2013

Drawing Cakes #2-4 Blog Post


Here we are with the coloring process that I use in my drawings.  I've provided links in the above video that navigate from videos 2, 3, and 4.  Please enjoy, share and comment.

With that said, here lies the coloring tools that I use:
 
I usually combine drawing with crafting, so I wanted to make sure to point out that I love scrap-booking paper (as seen above).  This type of paper comes in handy when you don't necessarily want to color/design a character's clothing or backdrop.  It's also useful when you want to reach for something unique, different, and abstract to the eye.  Now don't get me wrong, I love coloring in my own clothes and backgrounds; however, sometimes scrap-booking paper can do what I can't.  They further help my vision come alive by popping with a different, dynamic set of colors alongside those that are hand produced.  Sometimes they're tricky to use because you have to remove portions of the drawing to achieve the effect that you're after.  But my goodness, when you get it right--you get it right.  Especially with portrait-style drawings.  

 
The brand of color pencils that I use are Prismacolor and, even more specifically, their soft core pencils.  I use color pencils for a variety of techniques surrounding a drawing.  However, the main purpose is for blending in the tones that make up the eye of the character.  Example: If a character is blue-eyed, then I take three different shades of blue to create a gradient look to the eye.  Nevertheless, I also use color pencil for small detailing and designing, but another important technique I use these for is character hair.  

As seen in the video, I usually do a character's hair in four layers.  I base paint it with water-color determined by the character's hair color of choice.  (Note: if the character's hair color is black, I use a light purple or light blue base because black on black can come off as too heavy.)  Then I use chalk pastels to further flesh out the color, giving it shape and dept.  After this layer I find three shades of one matching color pencil, or two shades and an automatic black color pencil, to draw and add flair to the character's hair before the final layer of highlighting the character's hair via an eraser.  This eraser layer gives the hair movement.
 
 
I love water coloring mostly for small details, filling large spaces, and background flourishes.  Nevertheless, the majority of its us is for adding a base color to another layer of color using a different tool.  Occasionally it's the opposite way around where I use another type of coloring tool (such as a coloring pencil) as a base and use water colors to fill everything in further.  In any regard, I like water color because it's light enough for blending and strong enough that you can cover/color over certain areas that aren't coming alive like you'd hope.  Furthermore, it's just fun!

 
Chalk pastels are probably my favorite coloring tool.  Back in the day these were the tools that really took my drawings to another level of applied techniques.  And I've stuck with what I've learned till this day.  See, I didn't have money for expensive markers and had to make due with what was available to me.  Luckily, an old art teacher had an old set of chalk pastels that I could use to explore my passion with after she taught us a few tricks on using them during a school project.  While chalk pastels can be messy (even ruining a drawing) and take careful use to control, the way they blend over wide spaces is just unbeatable, considering what I'm trying to achieve with a particular drawing.  And because it can be a little too harsh when applying darker shades, you also have the added benefit of merging two different tones to keep a happy medium.  There is just something soothing about blending with chalk pastels, which is why I've stuck with them despite their messiness.

---------------------------------------

Okay!  Those are my coloring tools that I use.  Occasionally, I find a reason to use oil pastels, crayons, and acrylic paint.  I also have been known to use hair color spray and other scrap booking materials such as stickers and plastic gems.  Once the drawing is scanned, I carefully decide whether or not it can use the Revive Color filter or not in my design program; physical and digital prints usual look differently to me.  

Whatever it takes to honor a vision, I say.

And last but not least, a scan of the finally results from the video series Drawing Cakes...

Michael Yoon's Legend

 
Thanks for reading and watching this series of posts and videos.  I hope it inspires those who are looking for ideas.  And just remember that when you express yourself through drawing--whatever that may be--remind yourself that you're a pipeline of ideas that will never dry up.  Keep going.  Keep exploring.  Keep imagining.  Don't let anyone tell you that what you envision and produce is less than another form of art.  If it's in you, it's there for a reason.  It's there to be expressed, not stifled down.  

If you miss Drawing Cakes #1 post on inking, here is the link: http://www.comictowel.com/2013/11/drawing-cakes-1-blog-post.html

Tuesday, November 5, 2013

Drawing Cakes #1 Blog Post


Okay guys, here is a little more details into the pencils, pens and markers I use to draw with.  But first, you need a sweet container to carry all of them.  Such as this cool one I found...
 
Little drawers for erasers and pencil sharpers.

 
Slim, compact, and easy access.

 
You need paper to draw on, naturally.  Personally, I am enamored with Bristol paper.  Matter-of-fact, I'm kind of obsessed with it.  Before I used regular premium drawing paper.  Then I discovered that the stock of Bristol paper works better for me.  I like it because it works well with the crafting aspect of many of my drawings.  Plus, there's just something reliable about this type of paper.  Its hardness appeals to my drawing muse (^_^).  This particular pad is from recycled paper, which is always great to pick from to "do your part".


Nothing but gentle block style erasers work for me during the sketching process.  You definitely don't want to use anything super abrasive like Pink Pearl.  White, clean, and gentle is the way to go.  The same applies for the eraser pen that helps with small lines.  I have two pencil sharpeners.  One seems to work better with the color pencils I use while the other for regular drawing pencils.  Other than that, I lose sharpeners a lot.  Because I mix drawing with crafting, I also have an X-Acto Knife handy.  You'll soon see why.

 
The start of every sketch: pencils.  With the exception of the two blending pencils (those with the white tips), I use the lightness of H and 2H pencils.  Something like 2B or beyond 2H is entirely too harsh for me.  The difference is the lead in the pencil.  The higher the number and letter combination, the stronger the lead is in the pencil.  So H and 2H has a softer lead material than something like a 9H drawing pencil.  You could say that I like to sketch almost invisibly, but I'm always mindful of possible lines dug into the paper because of hard sketching.  While I do have a mechanical pencil shown here, I rarely use it.  I love my wood and lead combo.  Therefore, H and 2H remain my favorite sketching pencils.


Time for ink.  But first I should share something you should be aware of before you move from the sketching stage: LOOK AT YOUR SKETCH THROUGH A MIRROR!  That's right.  Take your sketch and look at it through a mirror.  Through its reflection, you will see just about every uneven line, swoop, or curve that your eye doesn't catch otherwise.  I learned this a long time ago.  It works especially for someone like myself who loves to draw portraits of pretty manga-inspired characters.  Nevertheless, I wouldn't be so hard on myself should I miss something.  Sometimes you got to let mishaps be.  

This here is a small collection of the ink pens I use after a sketch.  I do have a calligraphy pen that holds speedball types A, B, C, D.  It's fun dipping into India ink, but I haven't used it in a while because I don't care too much for the grip.  It's not too necessary.  This set here is helpful because each tip provides a different gradient for what you want to achieve in your drawing.  If you want a really heavy line, you'll use a 1.0mm sized pen.  A little thicker?  Try the 0.6mm pen.  The Faber-Castell pen at the top uses India ink and its marked with B for Big or even Bold.  Because I bought this brand in a kit, there is also an M for Medium and S for Small and XS for Extra Small.

The funny thing about many of the pens here is that the smaller pens dry out to quickly.  Which is fine because the best--and absolute BEST--inking pen is...
 
 
...this one!  I got a close snapshot of the name and style.  You can take a note and buy it at Wal-Mart (that's right) in a two-pack deal.  This pen is amazing.  For someone who sketches neatly and inks just as neatly, this pen saved me a lot of headache because I don't color as neatly.  The tip is so fine, so precise (as the pen states), that it just makes your inked sketch look so delicate and clean for color.  I could go on and on about this pen, but I won't.  A funny observation I noticed is that it dries slower on paper than a lot of the other pens I mentioned.  Therefore, give yourself a second after inking to erase pencil lines.

 
Everybody who is inspired by manga art knows about Copic Sketch markers shipping over from Japan.  People use either Copic or Prismacolor.  I own a few of both, and yeah, Copic is probably my most preferred.  Why?  Mainly because they don't dry up nearly as fast as Prismacolor and they are superior for blending with my other coloring methods.  That's just my experience, though.  Needless to say, both brands are expensive--and rightfully so considering how amazing they are.  Thankfully, I don't use either to color my drawings (the next post will be dedicated to my coloring methods), and that's not because I am too cheap.  I'm simply not a fan of using markers to color entire drawings.  I don't like the back-and-forth of markers over wide spaces, if that makes sense.

With all that said, I own only flesh-tone Copic markers that I use for shadowing and outlining characters.  I'll be sharing this in the next video.

Thanks to those who read all of this and please feel free to share any ideas, methods or drawing tools.

The next post and series of videos on coloring can be found here: http://www.comictowel.com/2013/11/drawing-cakes-2-4-blog-post.html

Total Pageviews