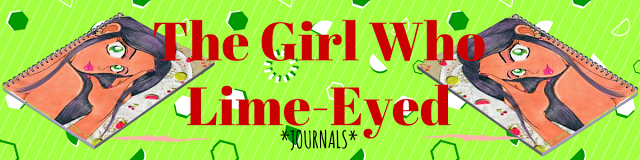
Cut. Clipped. Edged out of a piece of Bristol board to draw a smaller picture. Or what initially was going to be a mini-comic that just wouldn’t… mini! So instead, I sketched a quick drawing. As always, I found conflict with what to do with her hands. Nonetheless, I went for the simple and clean approach.
The inking followed. With no specific character in mind, I tossed around her eye color until I just decided to make them a limey green. And because she’s a person of color, I shadowed her a Copic Deep Orange. At first I wanted to leave her lips without lipstick, to instead go for a Copic Flesh Pink tone. But later, as you’ll see, that simpleness went out the window. Fact is, I love my girls flashy when it comes to lipstick, nail polish, etc. Anything outside of that seems… well… basic.
Now comes one of my favorite parts: scrapbook implementations. I’ve had this slice of cherry-themed paper for a while. It’s smaller than my usual pieces, so it’s hard to use on bigger projects. But since this was a smaller drawing–on a smaller piece of Bristol board–it fit perfectly. And because it’s been years since I use dollies, I thought adding the two would work this go-round. As always, I X-Acto Knifed her from the negative space. Which, thankfully, wasn’t much nor complicated.

Color. Color. Color. Paint and pastels. Layers on layers. Where to start? Okay. Her eyes have my traditional gradient effect. The theme–as mentioned–is lime. Lips colored soft pink alongside a darker shade of pink for her nails. Her skin tone has a soften blend of clay-colored chalk pastels mixed with a peach. To be honest, I had these scrapings (I used my X-Acto Knife to scrap chalk pastels into a pallet before blending) left over from my last drawing HERE. I saved them, and had just enough for this girl. I water colored her hair purple, which is tradition for me when drawing characters with dark hair. Following the watercolor, I spotted her hair with black chalk pastel. It always looks a little rustic look until I blend.

More layers. Gave ground to her pupils, and an iris effect where I black-dot around her full iris (not sure where I learned that from). Also, and it’s been a while, but I added eye shadow using a soft rub of pink chalk pastels. Too much? Maybe. I followed my tradition of using three colored pencils to streak and layer her hair. But I felt like I missed the flow around the part where she tucked her hair behind her ear. There needed to be some definition on where that piece of hair broke from the rest of the flow. So you can see where I added a darker line to separate the two. But from there, I got into this mood of using the black colored pencil to begin adding more fullness by shading her hair more with it. Experimenting I guess.
So yeah. Basically got to the final step, scanned, and realized she wasn’t complete. Pulling the drawing out of the scanner, I add the stickers. I’ve always wanted to use these–as the majority of them were featured my older project HERE. The left overs made it to this girl in the form of a cherry earring and floating fruit. In other words: CUTENESS IN EFFECT! No, for real. I love stuff like floating fruit.
But yes. In its digital process I added:
1. Revived her color for the digital look.
2. Retracing and filling her outline and other dark areas outside of her hair.
3. Filling her lips and nails with color before highlighting their shine with a touch of white.
I believe that’s just about it. So what should her name be?


No comments:
Post a Comment